nexus3安装
一、普通安装方式
1、下载需要的版本
https://help.sonatype.com/repomanager3/product-information/download
以3.13.0-01版本为例:下载的链接为:https://download.sonatype.com/nexus/3/nexus-3.13.0-01-unix.tar.gz
2、在服务器上创建nexus的目录
mkdir -p /opt/nexus
3、上传到服务器刚创建的目录,并解压
tar -zxvf nexus-3.13.0-01-unix.tar.gz
4、修改默认的一些配置
vim /opt/nexus/nexus-3.13.0-01/etc/nexus-default.properties
根据自己的需要去更改里面的配置
5、启动
# 进入目录
cd /opt/nexus
# 后台启动  可以通过nohup 启动指定日志文件 这里就用默认的nohup.out的日志文件了
nohup ./nexus-3.13.0-01/bin/nexus run &
6、设置自启动
a、新建启动脚本
进入/etc/init.d目录新建nexus文件,加入以下的内容
#!/bin/bash
#chkconfig:2345 20 90
#description:nexus
#processname:nexus
export JAVA_HOME=/opt/server/jdk1.8.0_51
case $1 in
        start) su root /usr/local/nexus-3.14.0-04/bin/nexus start;;
        stop) su root /usr/local/nexus-3.14.0-04/bin/nexus stop;;
        status) su root /usr/local/nexus-3.14.0-04/bin/nexus status;;
        restart) su root /usr/local/nexus-3.14.0-04/bin/nexus restart;;
        dump) su root /usr/local/nexus-3.14.0-04/bin/nexus dump;;
        console) su root /usr/local/nexus-3.14.0-04/bin/nexus console;;
        *) echo "Usage: nexus {start|stop|run|run-redirect|status|restart|force-reload}"
esac
b、设置权限
chmod +x /etc/init.d/nexus
c、添加到开机启动
chkconfig --add nexus
d、查看nexus开机启动
[root@worker10-152]#chkconfig --list nexus

注:该输出结果只显示 SysV 服务,并不包含
原生 systemd 服务。SysV 配置数据
可能被原生 systemd 配置覆盖。

      要列出 systemd 服务,请执行 'systemctl list-unit-files'。
      查看在具体 target 启用的服务请执行
      'systemctl list-dependencies [target]'。

nexus           0:关    1:关    2:开    3:开    4:开    5:开    6:关
e、查看状态
[root@worker10-152]#service nexus status
WARNING: ************************************************************
WARNING: Detected execution as "root" user.  This is NOT recommended!
WARNING: ************************************************************
nexus is running.
二、docker安装方式
chmod -R 777 /opt/nexus/nexus-data
docker run -d -p 8081:8081 --name nexus -v /opt/nexus/nexus-data:/var/nexus-data --restart=always sonatype/nexus3
将容器内部/var/nexus-data挂载到主机/opt/nexus/nexus-data目录。
三、docker-compose安装方式
chmod -R 777 /home/nexus3/data
version: '3.8'
services:
  nexus:
    image: sonatype/nexus3:3.63.0
    container_name: nexus
    restart: always
    ports:
      - "8081:8081"
      - "8082:8082"
    volumes:
      - /home/nexus3/data:/nexus-data
    environment:
      - INSTALL4J_ADD_VM_PARAMS=-Xms2G -Xmx2G -XX:MaxDirectMemorySize=2G
    ulimits:
      nofile:
        soft: 65536
        hard: 65536
  volumes:
    nexus-data:
      driver: local
等待启动成功看登录后台,密码从日志cat /home/nexus3/data/admin.password查看
四、普通安装方式
1、获取默认的密码
默认的初始化用户名与密码为admin/admin123
在解压同级目录中也会有一个sonatype-work生成,初始化登录密码在sonatype-work目录下的这个文件中 admin.password中
cat /opt/nexus/sonatype-work/nexus3/admin.password
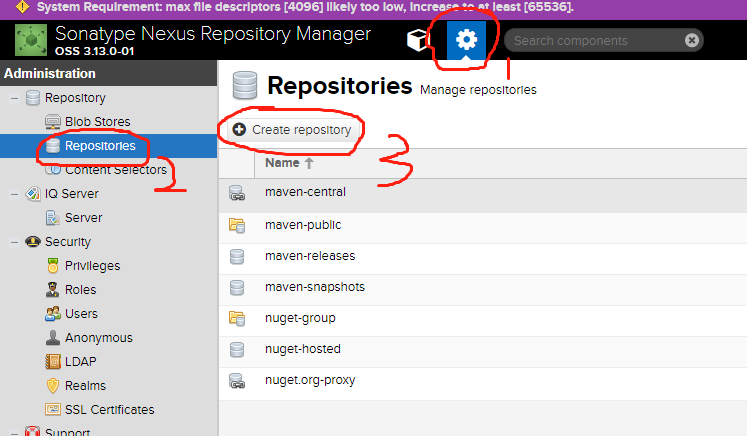
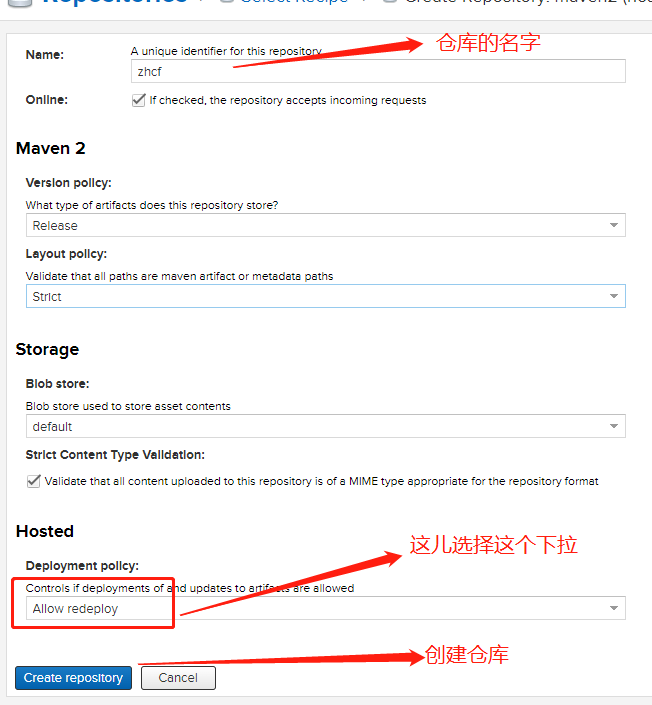
2、创建私仓
1、按照图片的顺序点击按钮
2、然后选择maven2(hosted)
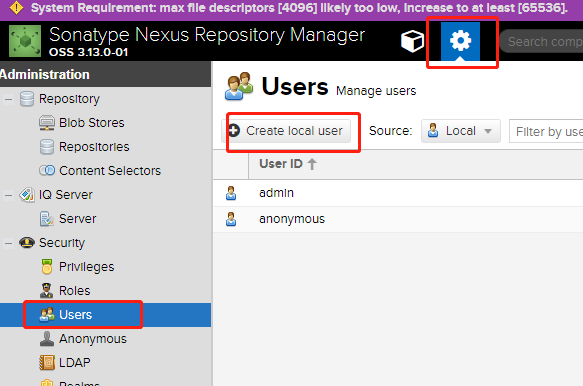
3、创建私仓账号
4、查看版本
设置-->Support-->System Information
5、备份
将sonatype-work整体备份即可
6、还原
1、停止服务
2、将备份文件覆盖sonatype-work文件价即可或者修改/opt/nexus/nexus-3.13.0-01/bin/nexus.properties的配置来重新指定仓库的目录
-Dkaraf.data=../sonatype-work/nexus3